Last Updated on August 10, 2023 by Tony
How to Solder Pogo Pins: The Ultimate Guide
Whether you’re working on an electronics project or creating a prototype for your latest invention, at some point you’ll need to know how to solder pogo pins. Pogo pins are spring-loaded connectors that make it easy to connect and disconnect electronic components without having to solder them each time. In this guide, we’ll show you how to solder pogo pins so that you can get started on your next project.

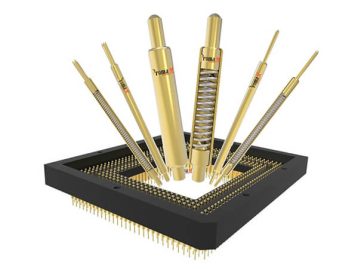
What Is a Pogo Pin?
A pogo pin is a spring-loaded connector that is used to connect and disconnect electronic components. Pogo pins are often used in prototypes and devices that require frequent connection and disconnection of components. Pogo pins are also known as spring-loaded pins, locking pins, or push-pull pins.

When Should You Use a Pogo Pin?
Pogo pins are most often used in prototypes and development boards. They can be used to connect and disconnect electronic components quickly and easily. Pogo pins are also sometimes used in place of traditional solder joints. This can be helpful when you need to make frequent connections and disconnections, or when you need to remove and replace components frequently.

How to Solder Pogo Pins?
Before you begin, it’s important to gather the following materials:
- Pogo pins
- Solder
- Flux
- Soldering iron
- Wire cutters
- Wire strippers
- Heat shrink tubing (optional)

Step One: Prepare the cable
Begin by cutting the cable to the desired length. Next, strip the insulation from the end of the cable. Be sure to leave enough wire exposed so that it can be soldered to the solder cup pogo pin.
Step Two: Prepare the Pogo Pin
If you are using a solder cup pogo pin, solder a short length of wire to the pogo pin. This will be used to connect the Pogo pin to the PCB. If you are using a surface-mount component, skip this step.

Step Three: Solder the wire to the pogo pin
Now it’s time to solder the wire to the pogo pin. First, apply flux to the solder cup of the pogo pin. Then, place the wire against the pogo pin so that the exposed wire is touching the internal surface of the cup. Apply heat to the joint with your soldering iron until the solder melts and flows around the joint. Be sure to apply enough solder so that the joint is strong and secure.

Step Four: Solder the wire to the PCB.
Use the same method to solder the wire to the PCB.
Step Five: Test the Connection
Once the Pogo pin is soldered to the PCB, it’s time to test the connection. Connect the component to the device or board that you are using. Apply pressure to the pogo pin so that it makes contact with the mating part. If the connection is good, the device should power on or function as normal.

Things to Keep in Mind
When soldering pogo pins, it’s important to keep a few things in mind:
- Pogo pins are spring-loaded: Be careful not to apply too much pressure to the pogo pin when soldering. This can cause the spring to become damaged or dislodged.
- Pogo pins are delicate: Handle pogo pins carefully to avoid bending or breaking them.

- Solder joints can be fragile: Be careful not to apply too much heat to the joint when soldering. This can cause the joints to become damaged or dislodged.
- Pogo pins are often used in place of traditional solder joints: If you need to disconnect a pogo pin, be sure to remove the entire pogo pin from the component. Do not try to disconnect the Pogo pin by pulling on the wire. This can damage the component or the pogo pin.
With these tips in mind, you should be able to solder pogo pins with ease.
Method 2: Using a Pogo Pin Jig
If you’re working with a lot of pogo pins, it may be helpful to use a pogo pin jig. A pogo pin jig is a device that holds the pogo pins in place while you solder them. There are many different types of pogo pin jigs available, so be sure to choose one that is compatible with the type of pogo pins you are using. Once you have a pogo pin jig, follow these steps to solder your pogo pins:

Step One: Place the Pogo Pin in the Jig
Begin by placing the pogo pin in the jig. Be sure to place it in the correct position so that it will be correctly aligned when you solder it.
Step Two: Solder the Pogo Pin
Once the pogo pin is in place, solder it to the board. Be sure to use good quality solder and apply enough heat to properly melt the solder.

Step Three: Remove the Pogo Pin from the Jig
Once the pogo pin is soldered in place, remove it from the jig. Be careful not to disturb the other pogo pins in the jig.
Step Four: Repeat Steps One Through Three for Each Pogo Pin
Repeat steps one through three for each pogo pin you need to solder. Once all of the pogo pins are soldered in place, you can proceed to the next step.

Method 3: Using a Pogo Pin Tester
If you’re working with a lot of pogo pins, it may be helpful to use a pogo pin tester. A pogo pin tester is a device that tests the continuity of the pogo pin connection. There are many different types of pogo pin testers available, so be sure to choose one that is compatible with the type of pogo pins you are using. Once you have a pogo pin tester, follow these steps to test your pogo pins:
Step One: Connect the Pogo Pin Tester to the Pogo Pin
Connect the Pogo pin tester to the Pogo pin you want to test. Make sure that the tester is properly connected to the pogo pin, as a loose connection can give false readings.
Step Two: Test the Continuity of the Connection
Once the tester is properly connected, test the continuity of the connection by pressing the “test” button. The tester will indicate whether or not the connection is continuous. If the connection is not continuous, there may be a problem with the Pogo pin or with the connection between the Pogo pin and the device it is connected to.

Troubleshooting:
If you are having trouble getting a continuous connection, check the following:
- Make sure that the pogo pin is properly seated in the connector.
- Make sure that the pogo pin tester is properly connected to the pogo pin.
- Check the continuity of the connection between the Pogo pin and the device it is connected to.
- If the problem persists, try replacing the Pogo pin.
Pogo pins are a great way to make temporary or permanent connections between two electronic devices.

Method 4: Using a Pogo Pin Holder
If you’re working with a lot of pogo pins, it may be helpful to use a pogo pin holder. A pogo pin holder is a device that holds the pogo pin in place while you solder it. This can be helpful if you’re working with a lot of pogo pins or if you’re new to soldering.
Step One: Place the pogo pin in the holder.
The first step is to place the pogo pin in the holder. Make sure that the spring is facing up.

Step Two: Place the soldering iron on the pogo pin.
Now, place the tip of the soldering iron on the pogo pin. Wait a few seconds for the heat to transfer.
Step Three: Apply solder to the pogo pin.
Once the pogo pin is heated, apply solder to the joint. Be sure to use enough solder so that the joint is completely covered.
Step Four: Remove the soldering iron and allow the joint to cool.
After you’ve applied the solder, remove the soldering iron and allow the joint to cool. Once it’s cooled, you can remove the Pogo pin from the holder.

Conclusion
Pogo pins are a great way to make temporary or permanent connections between two electronic devices. And, with a little practice, they’re not too difficult to solder. We hope you found this guide helpful. Remember, if you ever have any questions about soldering, feel free to ask one of our experts.

FAQs
How do I connect my Pogo pins?
To connect your Pogo pins, you’ll need to solder them to your PCB. Pogo pins are plated with gold, so they’re very easy to work with. You can use a standard soldering iron and some flux paste to get the job done quickly and easily.
What is a pogo pin made from?
Pogo pins are made from brass. Therefore, the Pogo Pin has excellent electrical conductivity and can transmit signals stably, and carry a high current.

What is a pogo pin used for?
Pogo pins are often used in electronic applications where a reliable connection is required. They’re also used in many industrial applications where space is limited.
Are pogo pins reliable?
Pogo pins are extremely reliable and can withstand a lot of wear and tear. They’re often used in industrial applications where a reliable connection is required.

Can pogo pins transfer data?
Yes, pogo pins can transfer data. However, they’re not typically used for high-speed data transfer applications.
How do I remove the Pogo pin?
To remove a Pogo pin, you’ll need to desolder it from your PCB. Pogo pins are plated with gold, so they’re very easy to work with. You can use a standard soldering iron and some flux paste to get the job done quickly and easily.